
To change a wall clock mechanism, remove the clock hands and detach the old mechanism. Install the new mechanism and reattach the clock hands.
Changing a wall clock mechanism can breathe new life into your timepiece. This process is straightforward and doesn’t require advanced technical skills. Whether your clock has stopped working or you want to upgrade to a more accurate mechanism, you can easily replace it with a few tools.
This guide will help you through the steps, ensuring your wall clock ticks perfectly once again. You’ll need a small screwdriver, a new clock mechanism, and a bit of patience. Follow these instructions to make your clock as good as new.
Tools And Materials Needed
Changing the mechanism of a wall clock can seem challenging. But with the right tools and materials, it becomes a simple task. In this section, we’ll discuss the essential tools and required materials you’ll need.
Essential Tools
Having the right tools is crucial. Here’s a list of essential tools:
- Screwdriver Set – Different sizes for various screws.
- Pliers – For gripping and pulling out parts.
- Needle-nose pliers – For precise handling of small parts.
- Small Hammer – To gently tap parts into place.
- Ruler or Measuring Tape – To measure the clock parts.
Required Materials
These materials are needed to change the clock mechanism:
- New Clock Mechanism – Ensure it fits your clock.
- Batteries – Usually AA or AAA, check your new mechanism.
- Clock Hands – New hands if the old ones are worn out.
- Mounting Hardware – Screws and anchors to secure the clock.
Below is a table summarizing the tools and materials:
| Tools | Materials |
|---|---|
| Screwdriver Set | New Clock Mechanism |
| Pliers | Batteries |
| Needle-nose Pliers | Clock Hands |
| Small Hammer | Mounting Hardware |
| Ruler or Measuring Tape |
With these tools and materials, you’re ready to replace the clock mechanism. Follow the next steps to complete the process smoothly.

Credit: bestwallclock.com
Removing The Old Mechanism
Changing a wall clock mechanism can breathe new life into your clock. The first step is removing the old mechanism. This process requires careful attention to detail. Below, you’ll find a step-by-step guide to disassemble your clock and handle its delicate parts.
Disassembling The Clock
Begin by removing the clock from the wall. Place it on a flat surface.
- Remove the clock hands by gently pulling them away.
- Unscrew the back cover to access the mechanism.
- Carefully take out the old mechanism.
Ensure you keep all screws and small parts in a safe place. Using a small container can help.
Handling Delicate Parts
Clock parts are often fragile. Handle them with care to avoid damage.
- Use tweezers for tiny components.
- Avoid applying too much pressure.
- Lay parts on a soft cloth.
By being gentle, you can prevent breaking or bending delicate pieces. This ensures a smoother reassembly process.
| Step | Description |
|---|---|
| Remove Hands | Gently pull away clock hands. |
| Unscrew Back Cover | Use a screwdriver to remove screws. |
| Take Out Mechanism | Carefully pull out the old mechanism. |
Preparing The New Mechanism
Before changing your wall clock mechanism, you must prepare the new mechanism. Proper preparation ensures smooth installation and functionality. Follow these steps to get started.
Unpacking The New Mechanism
Carefully unpack the new mechanism from its packaging. Make sure you have all the parts and instructions.
- Remove the mechanism from the box.
- Check for any additional accessories.
- Keep the instruction manual handy.
Inspecting For Defects
Inspect the new mechanism for any defects. This step is crucial to avoid problems later.
| Component | Checkpoints |
|---|---|
| Clock Hands | Ensure they are straight and not bent. |
| Battery Compartment | Check for any cracks or damage. |
| Gears | Rotate them to ensure smooth movement. |
After inspecting, place the parts on a clean surface. This will make the installation easier.
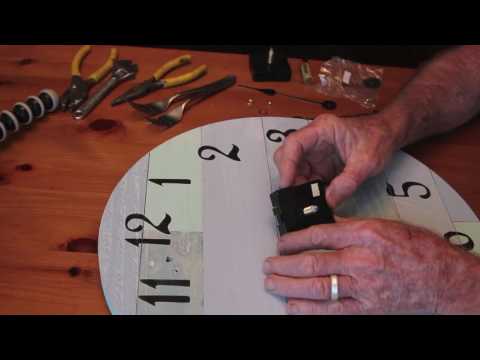
Credit: m.youtube.com
Installing The New Mechanism
Changing the wall clock mechanism is easy. Follow these steps to install the new mechanism. This guide helps you position and secure the mechanism properly.
Positioning The Mechanism
Start by placing the new mechanism at the center of the clock. Make sure the hour hand and minute hand fit well on the spindle. The mechanism should align with the clock face markings.
| Step | Action |
|---|---|
| 1 | Place the mechanism at the clock’s center |
| 2 | Align it with clock face markings |
| 3 | Ensure hands fit on the spindle |
Securing The Mechanism
After positioning, secure the mechanism. Use screws or clips to hold it in place. Make sure it is stable and does not move.
- Use appropriate screws for your clock type
- Ensure the mechanism does not wobble
- Double-check the alignment with the clock face
Finally, attach the clock hands. First, place the hour hand, then the minute hand. Make sure they move freely.
- Attach the hour hand
- Attach the minute hand
- Check that the hands move freely
Once secured, your wall clock is ready to use. Set the correct time and enjoy your newly fixed clock!
Attaching The Clock Hands
Attaching the clock hands is a delicate task. It requires patience and precision. Follow these steps to ensure your clock functions accurately.
Aligning The Hands
First, place the hour hand on the central shaft. Ensure it points to the 12 o’clock mark. Press it gently until it fits snugly.
Next, add the minute hand. Align it with the 12 o’clock mark as well. Ensure both hands are parallel and not touching each other.
Finally, if your clock has a second hand, attach it last. Ensure all hands move freely without interference.
Tightening The Nuts
Once the hands are aligned, secure them with nuts. Start with the hour hand nut. Tighten it using your fingers.
Next, secure the minute hand with its nut. Use a small wrench for a tighter fit. Ensure not to over-tighten.
Finally, if there’s a nut for the second hand, tighten it gently. Ensure all nuts are secure but not too tight.
Testing The New Mechanism
After replacing your wall clock mechanism, it’s crucial to test it. This ensures your clock works perfectly. Follow these steps to test the new mechanism.
Setting The Time
First, set the correct time on your new mechanism. Use the adjustment knob on the back. Turn it until the hands show the right time. Be gentle to avoid damaging the hands.
| Step | Description |
|---|---|
| 1 | Locate the adjustment knob on the back. |
| 2 | Turn the knob to set the correct time. |
| 3 | Ensure the hands move smoothly without sticking. |
Ensuring Proper Function
Next, check if the clock keeps accurate time. Observe it for a few hours. Watch if the hands move correctly.
- Listen for any unusual ticking sounds.
- Ensure the second hand moves smoothly.
- Compare the time with a reliable source.
If you notice any issues, adjust the mechanism again. Repeat the steps for setting the time. This ensures the mechanism is correctly installed and functioning.
Finally, hang your clock back on the wall. Make sure it’s secure and level. Enjoy your newly fixed wall clock!
Reassembling The Clock
Once you have successfully replaced the mechanism, it is time to reassemble your wall clock. This step ensures that your clock functions properly and looks good on the wall. Follow these simple steps to reattach the back cover and perform a final inspection.
Reattaching The Back Cover
First, take the back cover of your wall clock. Align it with the clock’s body. Ensure that all clips or screws match their respective slots. Gently press the cover into place until you hear a click. If your clock has screws, use a screwdriver to fasten them securely. Make sure not to overtighten the screws.
| Step | Description |
|---|---|
| 1 | Align the back cover |
| 2 | Press until you hear a click |
| 3 | Fasten screws if necessary |
Final Inspection
Now, inspect your wall clock to ensure everything is in place. Check the hands to see if they move freely. Turn the clock over and check for any gaps in the back cover. Make sure the clock mechanism is securely attached and not wobbling. Finally, set the correct time and hang the clock on the wall.
- Check the hands movement
- Inspect for gaps in the back cover
- Ensure the mechanism is secure
- Set the correct time
By following these steps, you will have a fully functional and well-assembled wall clock. Enjoy the accurate timekeeping and aesthetic appeal of your newly fixed clock!
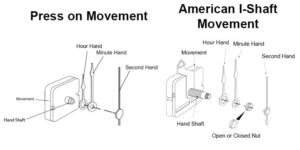
Credit: www.clockparts.com
Troubleshooting Common Issues
Changing a wall clock mechanism might seem easy, but issues can arise. This section will help you troubleshoot common problems. We will focus on two main issues: misaligned hands and mechanism stoppage.
Fixing Misaligned Hands
Misaligned hands can cause your clock to display the wrong time. This problem is usually due to hands being loose or improperly attached.
- First, remove the clock hands carefully. Use a small screwdriver if needed.
- Next, check for any visible damage or wear on the hands.
- Reattach the hands, making sure they are correctly aligned.
- Ensure the hour hand is placed first, followed by the minute hand.
- Finally, test your clock to see if the hands move correctly.
Addressing Mechanism Stoppage
Your clock mechanism might stop due to various reasons. It could be a power issue or a problem with the internal gears.
| Problem | Solution |
|---|---|
| Battery Dead | Replace with a new battery. |
| Loose Connections | Tighten all screws and connections. |
| Dust in Mechanism | Clean with a soft brush. |
Ensure the battery is fresh and correctly installed. If the mechanism still stops, check for dust or debris inside the clock. A soft brush can help clean the internal parts without causing damage.
Make sure to tighten any loose screws and connections. This ensures the power flows properly to the mechanism.
Frequently Asked Questions
Can You Replace A Clock Mechanism?
Yes, you can replace a clock mechanism. Carefully remove the old mechanism and install a new one. Follow the manufacturer’s instructions for best results. Ensure compatibility with your clock.
How Do You Unscrew A Clock Mechanism?
To unscrew a clock mechanism, first remove the back cover. Use a small screwdriver to carefully unscrew the mechanism.
How To Measure Replacement Clock Mechanism?
Measure the clock shaft length, diameter, and overall dimensions. Match with the new mechanism for a proper fit.
How Do Modern Wall Clocks Work?
Modern wall clocks use quartz crystals for accuracy. An electronic oscillator regulated by the quartz keeps precise time. Battery power drives the clock’s hands.
Conclusion
Changing a wall clock mechanism can be simple with the right steps. Follow the guide to ensure a smooth process. Always handle components carefully to avoid damage. Regular maintenance will keep your clock running efficiently. Enjoy the satisfaction of a perfectly functioning wall clock in your home.