To remove a quartz clock movement, first detach the hands and then unscrew the movement from the back. Carefully pull out the movement.
Quartz clocks are popular for their precision and minimal maintenance. Over time, however, you might need to replace or repair the movement. Knowing how to remove the quartz clock movement is essential for such tasks. Start by preparing a clean workspace and gathering basic tools like a screwdriver and pliers.
Detach the clock hands by gently pulling them away from the clock face. Next, locate and unscrew the retaining nuts or screws holding the movement in place. With these removed, you can easily pull out the quartz movement. This process ensures your clock remains in good working condition.

Credit: m.youtube.com
Preparation Steps
Removing a quartz clock movement requires careful preparation. This ensures the process goes smoothly and safely. Here’s a step-by-step guide to help you get started.
Safety Precautions
Before you start, ensure you follow these important safety precautions:
- Unplug the clock if it’s electric.
- Wear protective gloves to avoid cuts.
- Keep small parts away from children and pets.
- Work in a well-lit area to see clearly.
Setting Up Your Workspace
Setting up your workspace is crucial for a smooth process. Follow these steps:
- Clear a large, flat surface for your workspace.
- Lay down a soft cloth to protect the clock face.
- Gather necessary tools: screwdriver, pliers, and a small container.
- Use the container to hold small parts so they don’t get lost.
Here’s a table of the essential tools you’ll need:
| Tool | Purpose |
|---|---|
| Screwdriver | To remove screws |
| Pliers | To grip and turn components |
| Small Container | To hold small parts |
With these preparations, you’re ready to remove the quartz clock movement.
Credit: www.clockparts.com
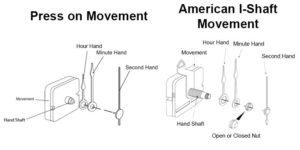
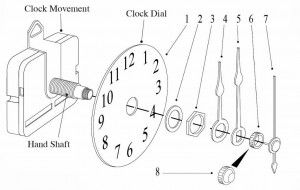
Removing The Clock Hands
Removing the clock hands is a crucial step in the process of replacing a quartz clock movement. Follow these steps carefully to ensure you do not damage the clock.
Securing The Clock
First, place the clock face-down on a soft surface. This prevents scratches. Use a towel or cloth for added protection. Ensure the clock is stable and won’t move.
Gently Removing The Hands
Next, locate the minute hand. It is usually on top. Use a pair of small pliers to gently lift the hand. Be careful not to bend or damage it.
Once the minute hand is off, move to the hour hand. This hand may be press-fitted. Gently wiggle it back and forth. Slowly lift it off the clock face.
If there is a second hand, it will be the smallest. Carefully remove it using the same gentle lifting technique.
Place all hands in a safe location. You will need them for reassembly.
Detaching The Movement
Detaching the movement of a quartz clock might seem daunting, but it’s straightforward. Follow these simple steps to remove the quartz clock movement safely.
Unscrewing The Back Plate
First, locate the back plate of the clock. This plate covers the clock’s inner workings. Use a screwdriver to unscrew the back plate. Be careful while doing this. Place the screws in a safe spot. You will need them later.
Disconnecting The Movement
After removing the back plate, you will see the clock movement. Look for the small clips or screws holding the movement. Gently disconnect these clips or unscrew them. This will release the movement from the clock casing.
Now, carefully lift the movement out of the clock. Ensure you do not damage any other parts. Your quartz clock movement is now detached and ready for replacement or repair.
| Step | Action |
|---|---|
| 1 | Unscrew the back plate |
| 2 | Store the screws safely |
| 3 | Disconnect the movement clips or screws |
| 4 | Lift the movement out |
- Use a proper screwdriver.
- Handle the clock gently.
- Store screws in a safe place.
- Lift the movement carefully.

Credit: m.youtube.com
Installing The New Movement
Once you have removed the old quartz clock movement, it’s time to install the new one. Follow these steps to ensure a smooth and efficient installation process.
Aligning The New Movement
Start by placing the new movement in the clock case. Ensure the movement is centered and aligned correctly. The hands should move freely without obstruction.
- Check the alignment with the clock face.
- Ensure the hour and minute hands point to the correct time.
- Adjust the position slightly if needed.
Double-check that the movement is properly aligned before proceeding. Proper alignment ensures accurate timekeeping.
Securing The New Screws
With the movement aligned, secure it with new screws. Use the appropriate screwdriver for your screws.
- Insert the screws into the pre-drilled holes.
- Tighten the screws gently to avoid stripping.
- Ensure each screw is tight and the movement is stable.
| Step | Action |
|---|---|
| 1 | Align the movement |
| 2 | Insert screws |
| 3 | Tighten screws |
After securing the screws, check the stability of the movement. It should be firmly in place with no wobbling.
Reattaching The Clock Hands
Reattaching the clock hands is a crucial step in ensuring your quartz clock works properly. Follow these steps to position and secure the hands accurately. Properly reattached hands will ensure accurate timekeeping and a smooth operation of your clock.
Positioning The Hands Correctly
Start by positioning the hour hand. Push it gently onto the center shaft. Ensure it points exactly at the 12 o’clock mark. This ensures the hour hand is aligned correctly.
Next, place the minute hand onto the shaft. Align it to the 12 o’clock position as well. This ensures both hands are in sync for accurate timekeeping.
Finally, attach the second hand if your clock has one. Ensure it is straight and pointing to the 12 o’clock mark. This ensures the smooth movement of the second hand.
Tightening The Hand Nuts
Once the hands are positioned, it’s time to tighten the hand nuts. First, make sure the hour hand is snugly fitted. Use a small wrench or pliers to secure it.
Next, tighten the nut for the minute hand. Be gentle to avoid damaging the hands. Use a small tool to ensure a firm fit.
Finally, if your clock has a second hand, tighten its nut carefully. Make sure all nuts are secure but not overly tight. This ensures the hands move freely without obstruction.
Below is a quick reference table for reattaching the clock hands:
| Step | Action |
|---|---|
| 1 | Position hour hand at 12 o’clock |
| 2 | Position minute hand at 12 o’clock |
| 3 | Position second hand at 12 o’clock |
| 4 | Tighten hour hand nut |
| 5 | Tighten minute hand nut |
| 6 | Tighten second hand nut |
Use these steps to ensure your clock hands are reattached correctly. This will ensure your quartz clock functions accurately and reliably.
Testing The New Movement
After replacing your quartz clock movement, it is crucial to test it. This step ensures your clock works accurately. Follow these steps to test your new quartz clock movement efficiently.
Inserting Batteries
First, insert the appropriate batteries into the new movement. Ensure the positive and negative ends match the markings inside the battery compartment. Incorrect placement can prevent the clock from working.
- Check the battery type required.
- Insert the batteries correctly.
- Secure the battery cover.
Setting The Correct Time
Once the batteries are in place, set the correct time. Use the adjustment knob on the back of the clock movement. Turn it gently to avoid damaging the mechanism.
- Locate the adjustment knob.
- Turn the knob to set the time.
- Ensure the hands are moving smoothly.
After setting the time, observe the clock for a few minutes. Ensure that the second hand is ticking consistently. This indicates that the new movement is functioning correctly.
Final Adjustments
After removing the quartz clock movement, some final adjustments are necessary. These steps ensure your clock runs smoothly. Let’s dive into the crucial aspects of final adjustments.
Ensuring Smooth Operation
First, double-check all connections. Ensure each part is secure. A loose connection can cause issues. Next, clean the clock hands. Dust can affect movement. Use a soft cloth to clean gently. Align the clock hands correctly. They should not touch each other. This prevents obstruction.
Finally, test the clock. Set the time and observe. Ensure the hands move freely. Any resistance indicates a problem. Address it immediately.
Troubleshooting Common Issues
Some common issues might arise. Here are solutions:
- Clock hands not moving: Check battery placement. Ensure it’s secure.
- Clock losing time: Check for dust or debris. Clean if necessary.
- Clock hands touching: Realign the hands. Ensure they move freely.
For persistent issues, consider professional help. Sometimes, a minor adjustment makes a big difference. Regular maintenance keeps your clock in top shape.
| Issue | Solution |
|---|---|
| Clock hands not moving | Check battery placement and connections |
| Clock losing time | Clean dust and debris |
| Clock hands touching | Realign hands properly |
Frequently Asked Questions
How To Remove Quartz Movement From A Clock?
To remove quartz movement from a clock, first, remove the clock hands. Next, unscrew the clock face. Finally, gently detach the quartz movement unit.
Can You Adjust A Quartz Clock Movement?
Yes, you can adjust a quartz clock movement. Use the adjustment knob on the back to set the time.
How Do You Clean A Clock Movement Without Disassembly?
Use a soft brush to remove dust. Apply clock cleaning solution with a cotton swab. Avoid excess moisture. Dry with a lint-free cloth. Ensure movement is fully dry before use.
How To Remove Hands From A Clock Mechanism?
To remove hands from a clock mechanism, first, gently pry off the cap. Next, carefully unscrew or lift the hands. Finally, pull the hands straight off the center post.
Conclusion
Successfully removing a quartz clock movement is simple with the right steps. Follow the guide closely for optimal results. Ensure you have all necessary tools beforehand. This will make the process smoother and more efficient. Remember to handle all parts gently to avoid damage.
Enjoy your newly repaired clock!